Proof Submission with Tenderly Tutorial

In this tutorial we'll go through the process of submitting and verifying a Polygon CDK proof to the zkVerify chain.
Requirements
- A Substrate compatible wallet with funds (ACME) connected to the network
- Please refer to our Connect a Wallet guide for instructions on which wallet to setup and how to configure the zkVerify testnet, if you haven’t done so already. You can also learn more about how to request ACME test tokens on that guide, which will be needed for this
- A Polygon CDK (Fork_ID 6) FFLONK proof
Step 1
Identify a VerifyBatches or VerifyBatchesTrustedAggregator transaction that is compatible with fork id 6.
It is possible to find the this kind of transaction at this address (Polygon CDK Proxy contract). According to this releases document the time range in which you can look for transactions is between November 2023 and January 2024.
For example:
https://etherscan.io/tx/0x5c74be04b086dccaf27e6138d468fd9a3cd3a7e295eaebe717a7a88c82a1054a
Step 2
Gather the Public Input and the Proof using Tenderly.
Replace your transaction ID in this URL: https://dashboard.tenderly.co/tx/1/YOUR_TRANSACTION_ID/debugger?trace=0.2.1.1.3
For example:
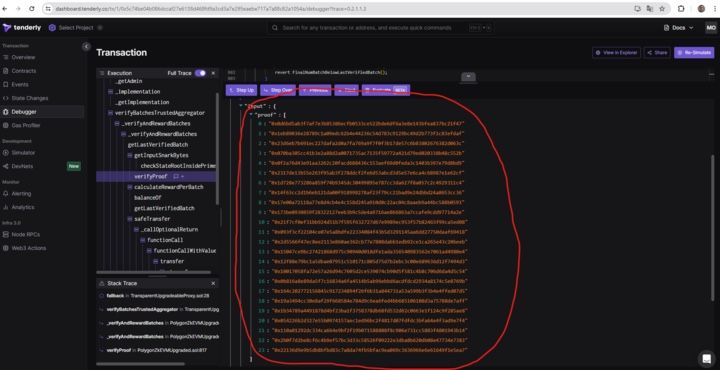
From the bottom console copy the content of the field proof and remove all the junk characters to make it into a single line without " and 0x (apart from the first).

In this example, the value is:
0x0d6bd5ab3f7af7e3b85386ecfb0533ce522bde6df6a3e8e143bfea837bc21f471eb89036e28789c1a09edc62b4e44236c54d783c9129bc49d2b773f1c83efdaf23d6eb7b691ec227dafa2d0a7fa769a9f7f0f3b17de57c6b83802676382d063c070ba305cc41b3e2a88d2a0071735ac7135f59772a421d79ed020338b48c552b0f2a76d43e91aa3262c20facd688436c153aef69d0feda3c1403b397e79d8bd92317de13b55e263f95ab3f278ddcf2fe6d53abcd3d5e57e6ca4c68987e1e62cf1d728e773286a859f74b9345dc30499895e787cc3da627f8a057c2c4929311c414f63cc2d1b6eb121da00f918998278af23f79cc21bad9e24dbbd24a8653cc3617e00a72118a77e8d4cb4e4c158d245a910d0c22ac04c8aaeb9a44bc588b0593173be0930859f28322127eeb3b9c5de4a9716ae866863a7ccafe9cdd97714a2e21f7cf0ef31bb924d51b7f595f632727d67e9989ec953f57b82465f99ca5ed08093f3cf22104ce07e5a8bdfe22334084f43b5d3291145aa6dd27750daaf694182d5566f47ec8ee2113e860ae362cb77e7808dabb1edb92ce1ca265e43c20beeb15047ce9bc27421868d975c90940d018dfe1ada356540983562e7061ad4980e412f88e79bc1a5dbae07951c510171c805d75d7b2ebc3c00e689636d12f7494d310017058fa72e57a26d94c7605d2ce539074cb90d5f581c4b8c706d6da4d5c540b816a8e89da5f7c16834a6fa4514b5ab96ebbd6acdfdcd2934a8174c5e8769b164c202772156845c917234894f26f6b31a844731a53a599b3f3b4e4ffed07d519a3494cc30e8af29f668584e784d9c6ea6fed4bb685106108d3a75788de7aff1b34789a4491878d4bf23ba1f3758378db68fd532d62c0663e1f124c9f285ae8054226b2d327e55b0974157aec1ed96bc2f4817d07fdfdc3bfa64e4f3ad9e7f4110a01292dc334ca664e9bf2f19b071588808f8c906e731cc5883f4801943b142b0f7d2be8cf6c4b9ef57bc3d33c58526f09222e3dba8b620db08e47734e738322136d9e9b5db8bfbd83c7a8da74fb5bfac9ea069c3636966e6e61649f1e5ea7
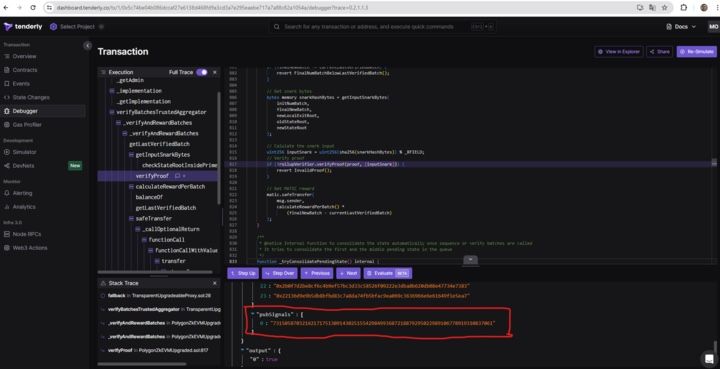
And the content of the field pubSignal (Public Input)

In this example, the value is: 7315058703216217175130914302515542984993687218879295022989106778919310837061
Convert it into a hexadecimal format to obtain: 102C2D2F58997310C191634E1A71B00CDC4DD6E28B5BB42587ED8F40F119C545
The final step is to concatenate the proof and the Public Input into a single string.
0x0d6bd5ab3f7af7e3b85386ecfb0533ce522bde6df6a3e8e143bfea837bc21f471eb89036e28789c1a09edc62b4e44236c54d783c9129bc49d2b773f1c83efdaf23d6eb7b691ec227dafa2d0a7fa769a9f7f0f3b17de57c6b83802676382d063c070ba305cc41b3e2a88d2a0071735ac7135f59772a421d79ed020338b48c552b0f2a76d43e91aa3262c20facd688436c153aef69d0feda3c1403b397e79d8bd92317de13b55e263f95ab3f278ddcf2fe6d53abcd3d5e57e6ca4c68987e1e62cf1d728e773286a859f74b9345dc30499895e787cc3da627f8a057c2c4929311c414f63cc2d1b6eb121da00f918998278af23f79cc21bad9e24dbbd24a8653cc3617e00a72118a77e8d4cb4e4c158d245a910d0c22ac04c8aaeb9a44bc588b0593173be0930859f28322127eeb3b9c5de4a9716ae866863a7ccafe9cdd97714a2e21f7cf0ef31bb924d51b7f595f632727d67e9989ec953f57b82465f99ca5ed08093f3cf22104ce07e5a8bdfe22334084f43b5d3291145aa6dd27750daaf694182d5566f47ec8ee2113e860ae362cb77e7808dabb1edb92ce1ca265e43c20beeb15047ce9bc27421868d975c90940d018dfe1ada356540983562e7061ad4980e412f88e79bc1a5dbae07951c510171c805d75d7b2ebc3c00e689636d12f7494d310017058fa72e57a26d94c7605d2ce539074cb90d5f581c4b8c706d6da4d5c540b816a8e89da5f7c16834a6fa4514b5ab96ebbd6acdfdcd2934a8174c5e8769b164c202772156845c917234894f26f6b31a844731a53a599b3f3b4e4ffed07d519a3494cc30e8af29f668584e784d9c6ea6fed4bb685106108d3a75788de7aff1b34789a4491878d4bf23ba1f3758378db68fd532d62c0663e1f124c9f285ae8054226b2d327e55b0974157aec1ed96bc2f4817d07fdfdc3bfa64e4f3ad9e7f4110a01292dc334ca664e9bf2f19b071588808f8c906e731cc5883f4801943b142b0f7d2be8cf6c4b9ef57bc3d33c58526f09222e3dba8b620db08e47734e738322136d9e9b5db8bfbd83c7a8da74fb5bfac9ea069c3636966e6e61649f1e5ea7102C2D2F58997310C191634E1A71B00CDC4DD6E28B5BB42587ED8F40F119C545
Step 3
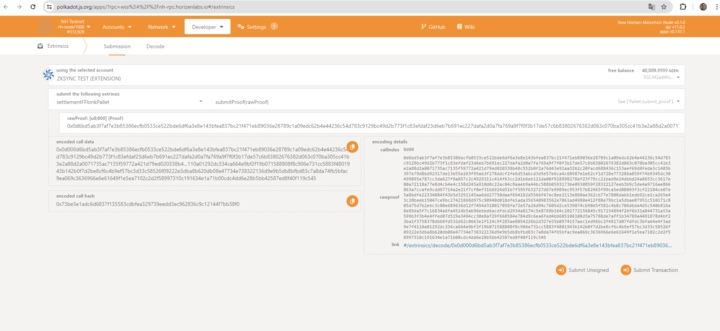
Send the proof to the ZkVerify chain. To do this you can use PolkadotJs.
- Select your account (you must have some ACME)
- Choose the settlementFFlonkPallet
- Inside the field rawProof paste the string obtained from the previous step
- Click on submitTransaction

Step 4
Check your transaction on the ZkVerify Block Explorer!
We also have a step-by-step demo video available for users, if you would prefer to follow along there!
As always, the team is available on the zkVerify Discord for any support needed, questions, and more, please don’t hesitate to reach out to us!